10 Finishing Seams

Learning Outcomes
By the end of this unit, you should be able to correctly
-
Clip, notch, and grade seams
-
Select and correctly use appropriate pressing tools for various seam shapes
Finishing Seams
Sewing seams is only the beginning of garment construction. Seam finishing—through trimming, grading, notching, and pressing—transforms a rough assembly into a smooth, professional-looking piece. Grading reduces bulk; notching and clipping help curved seams lie flat; and pressing shapes and sets the fabric. Mastering these skills ensures garments fit well, move comfortably, and appear polished on stage.

Grading Seam Allowances
Grading (also called layering) is the process of trimming each layer of seam allowance to a different width to reduce bulk. This technique is especially important in areas with multiple layers of fabric, such as collars, facings, and waistbands, where thick seam allowances can create unwanted ridges or distort the shape of the garment.
Why Grade Seams?
-
Reduces visible ridges on the garment’s right side
-
Allows curved and layered areas to lie more smoothly
-
Improves the overall comfort, fit, and appearance of the finished piece
Step-by-Step: How to Grade a Seam
Step 1: Sew and Press Seam Open or to One Side
-
Complete the seam as instructed.
-
Press the seam allowances either open or to one side, depending on the construction needs.
Step 2: Identify the Layers
-
If you’re working with two layers (e.g., garment and facing), you’ll have two seam allowances.
-
If there are more (such as interfaced layers or linings), grade each accordingly.
Step 3: Trim the Seam Allowances in Layers
-
Start by trimming the innermost seam allowance (the one closest to the body) the shortest—about ¼”.
-
Trim the next layer slightly wider—about ⅜”.
-
If there are more layers (such as interfaced fabric or linings), grade each layer progressively.
Step 4: Taper the Ends
-
At the ends of seams or where layers meet (like a corner or junction), taper the graded edges gradually to reduce lumps.
Step 5: Press Again
-
After grading, press the seam allowances again to help set the shape and flatten the layers. Use a ham or seam roll if the area is curved.
🎥 Demo:Trimming and Grading Seams
Learn the difference between grading and trimming seam allowances.
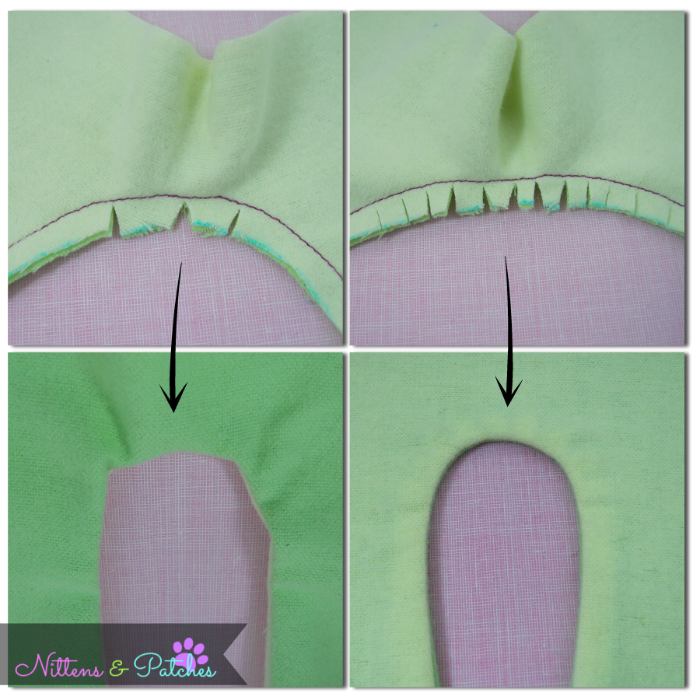
Notching and Clipping for Curved Seams
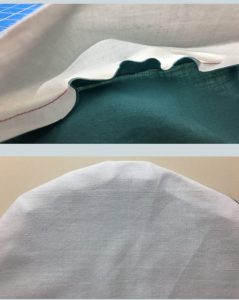
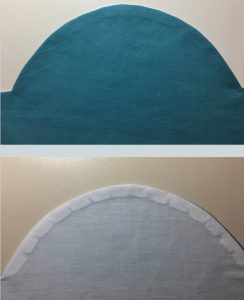
Notching and clipping after trimming or grading seam allowances allow curved seams to lie more smoothly when turned right side out.
Neglecting to notch or clip a curve may result in a bumpy or wavy appearance when turning right side out.
 |
 |
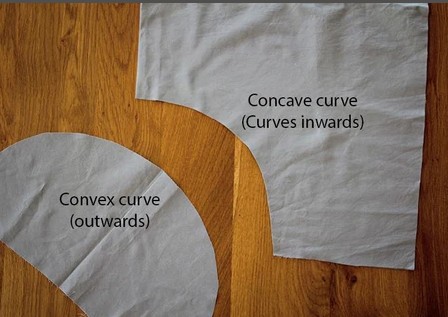
Convex vs Concave
- Convex Curve: An outward curve, like the outer edge of a circle or a rounded hem on a shirt.
- Concave Curve: An inward curve, like the neckline of a dress or the armhole of a garment.
Convex Curves → Notching
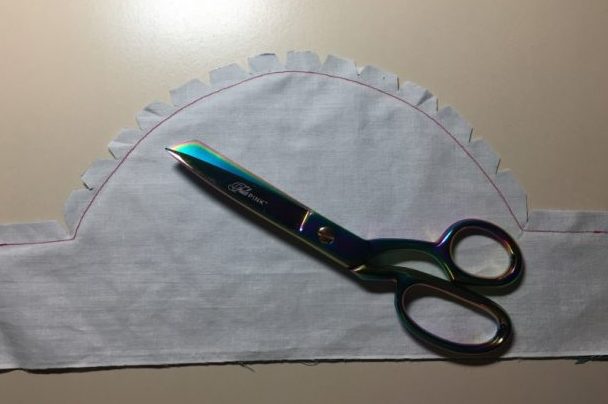
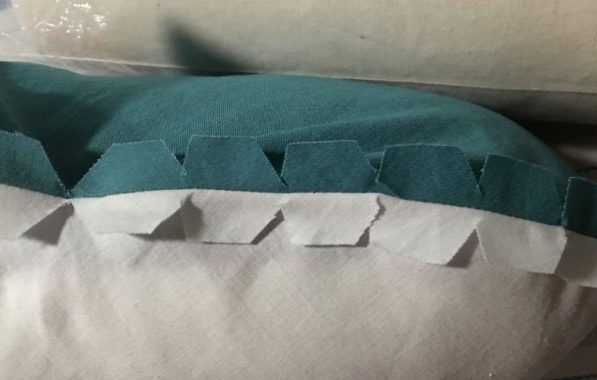
Notching refers to the technique of cutting small notches (triangles) out of the seam allowance approximately every 1/2-1 inch. It is used on CONVEX curves. If fabric is bulky, you may also want to grade seams prior to notching. Always notch or clip after stitching and trimming, but before turning and pressing.
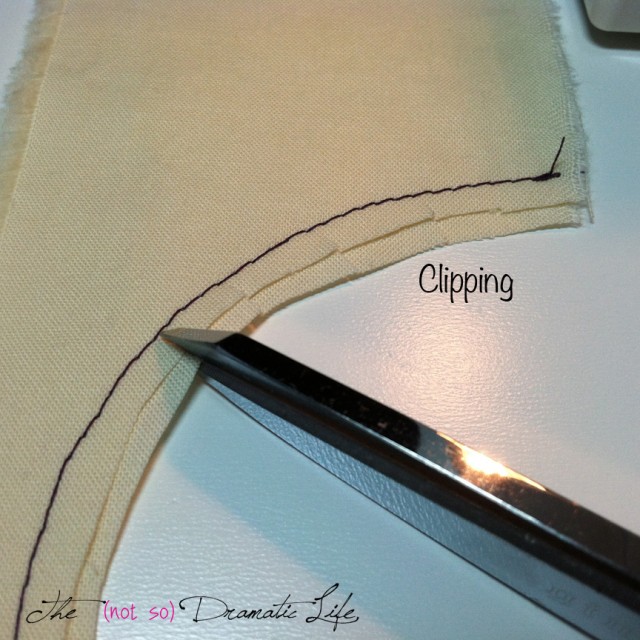
Concave Curves → Clipping
Clipping a concave curve in sewing involves making small cuts into the seam allowance along an inward curve to allow fabric to lie flat when turned right side out. These cuts go to but not through the stitching. This technique is essential for preventing puckering and ensuring a smooth, even curve in areas like necklines or underarm seams. The more extreme the curve, the closer together the snips needed. Always notch or clip after stitching and trimming, but before turning and pressing.
 |
 |
Trimming Corners
Trim across the stitched corner to remove the point, then taper the seam allowances on either side. This eliminates bulk and helps form a sharp corner after turning.
🎥 Demo: Clipping and Trimming Seam Allowances
See when and how to trim, grade, clip and notch to achieve the best results with your seam allowances.
Turning and Pressing for a Smooth Finish
Turning refers to the process of turning a piece of sewing right side out after sewing. Pressing both before and after turning (from both the wrong and right sides) is a crucial part of getting a good result. The use of properly shaped pressing tools will help this process. Proper pressing after turning is essential for setting shapes and creating a crisp, professional finish.
Using a Tailor’s Ham
🎥 Demo: Ironing with a Tailor’s Ham
See how and why to use a ham to achieve good pressing results in curvy seams.
Using a Point Presser
A point presser is a sewing tool with a pointed end used to press seams and corners, especially in hard-to-reach areas like collar points. It helps create sharp, crisp edges and corners by providing a firm, narrow surface for ironing.
Prepare the corner: Trim seam allowances to reduce bulk, especially at the corner.
Position the corner: Slide the corner of your fabric over the pointed end of the presser, aligning the seam with the point.
Press the seam: Use your iron to press the seam open or to the desired side, paying close attention to the corner.
Shape the corner: Gently press the corner itself, ensuring it’s crisp and well-defined.
🎥 Demo: How to use a Point Presser & Clapper
See how to use a point presser to achieve sharp corners.
ASSIGNMENT: FINISHED SEAMS
Supplies Needed
-
Sewing machine
-
Thread (any color top and bobbin)
-
Snips or scissors
-
(2) 8″ x 10″ fabric pieces with a clear right and wrong side
-
Page protectors and binder for storing labeled samplers
Note: Use backstitching at the beginning and end of all permanent seams. Label each sampler and store it in its own page protector.
Final Samplers (3 Total)
You will complete the following seam samples:
-
Convex Curve – Graded, Notched, Pressed, and Turned
-
Concave Curve – Graded, Clipped, Pressed, and Turned
-
90-Degree Corner – Graded, Trimmed, Pressed, and Turned
Convex Curve Sample
Objective: Practice grading and notching a convex (outward) curve and pressing it over a ham.
Instructions:
-
Place two 8″ x 10″ fabric pieces right sides together.
-
On the top piece, draw an arching convex curve from one 8″ side to the other.
-
Cut along the drawn line through both layers. Set aside the concave pair for the next sampler.
-
Align curved edges, right sides together, and pin perpendicular to the edge.
-
Stitch along the curve using a 5/8″ seam allowance. Begin 1″ from one end and backstitch to start and finish.
-
Trim thread tails.
-
Grade the seam allowances by trimming one layer to ¼”.
-
Notch the seam allowances every 1″ with triangular notches, cutting nearly to the stitching but not through it.
-
Place the seam over a tailor’s ham and press the allowances open.
-
Turn the fabric right side out and press the seam again until it lies flat and smooth.
2. Concave Curve Sample
Objective: Practice grading and clipping a concave (inward) curve and pressing it over a ham.
Instructions:
-
Use the concave pieces previously cut from the Convex Curve Sample.
-
Place them right sides together, aligning curved edges. Pin perpendicular to the edge.
-
Stitch along the curve using a 5/8″ seam allowance. Begin 1″ from one end and backstitch to start and finish.
-
Trim thread tails.
-
Grade the seam allowances by trimming one layer to ¼”.
-
Clip the seam allowances at 1″ intervals with snips going to—but not through—the stitching. Space snips more closely on tighter curves.
-
Press the seam allowances open over a tailor’s ham.
-
Turn the fabric right side out and press along the seam until the curve lies smooth.
3. 90-Degree Corner Sample
Objective: Practice grading and trimming at a right-angle corner and pressing with a point presser.
Instructions:
-
Place two 8″ x 10″ fabric pieces right sides together.
-
Pin perpendicular to two adjacent sides of the rectangle.
-
Stitch along one pinned edge using a 5/8″ seam allowance. Stop 5/8″ from the corner, leave the needle in the fabric, pivot 90 degrees, and continue stitching the next edge. Backstitch at the beginning and end.
-
Trim thread tails.
-
Grade the seam allowances by trimming one layer to ¼”.
-
Trim the seam corner by clipping across the stitched corner. Then trim both adjoining seam allowances diagonally to reduce bulk.
-
Press the seam allowances open using a point presser.
-
Turn the fabric right side out, gently shaping the corner.
-
Press along the seam until both edges and the corner are crisp and flat.
