4 Hand Stitching
Learning Outcomes
By the end of this unit, you should be able to correctly execute the following techniques/stitches.
- Threading and knotting
- Finishing knot
- Basting with running stitch
- Backstitch
- Overhand (whip stitch variation #2)
- Hemming Stitch (whip stitch variation #1)
- Cross Stitch
- Slip Stitch
Types of Hand Stitching
While hand stitching was once used to completely construct garments (and is still how high fashion garments are made), in the costume shop it is used for marking, basting, or permanent techniques (such as hemming) where a machine would not produce the desired result.
Basting:
temporary stitching used to secure pieces until final stitching can be done. Basting is sometimes preferred to pinning due to type of fabric or location of element.
Marking:
a removable basting thread may be used to transfer markings from pattern to fabric.
Permanent Hand Stitching:
some portions of a garment, such as hems or buttons, may be hand stitched as a matter of course as they are more easily accessed by hand sewing, produce an ‘invisible’ result, or are routinely replaced or moved.
Threading and Knotting
The Needle
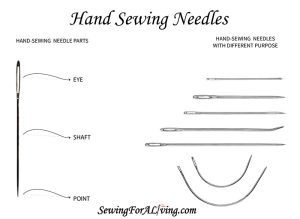
A hand sewing needle has three main parts: the eye, the shaft, and the point. The eye is the hole where the thread is inserted, the shaft is the body of the needle, and the point is the sharp end that pierces the fabric. They come in a variety of sizes, shapes, and point styles suitable for various fabric types.
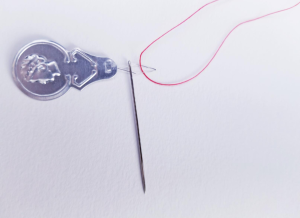
Threading the Needle
- Cut thread to desired length. For double thread sewing, approximately 1 yard is ideal.
- Insert one end through the eye of the needle and either draw it down to join the other end (double thread) or leave it shorter than the end to be knotted (single thread).
Double Thread vs Single Thread
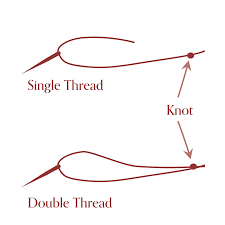
The choice to double or single thread your needle is dependent on the project. Those that require more strength, such as fasteners, use double threading. More delicate work that needs to be unobtrusive and does not take any strain might use single threading. In the costume shop, we most often use double threading.
💡Tip: If you’re having trouble threading your needle, try the following:
Trim the end of your thread to get a clean cut.
Wet it with saliva.
Needle Threaders
If you are struggling to thread, you may find a needle threader helpful. It uses a small wire loop that you insert through the needle eye, then use it to catch the thread and pull it through.
🎥 Demo: How to Use a Needle Threader
See how to thread a needle using a needle threader.
Knotting
There are many ways to tie a knot at the end of your thread. Find what works best for you. However, DO NOT tie a square knot. It is too fussy and too small! Here is the method that has the greatest success in our shop. It is known as the Quilters Knot. Note that the demo is for a single threading. If using a double thread, simply wrap both thread ends.
🎥 Demo: Knotting the Thread #1
See how to create a simple Quilters Knot for hand sewing.
Tying an End Knot (Knotting Off)
As with knotting your threaded needle, there are many methods. Here is one we use most often.
🎥 Demo: Knotting Off
See how to sew knot at the end of your sewing
Steps
- Make your last stitch. Make sure you have at least 5” or 6” of remaining thread, as you will need it to make the knot.
- Take a small stitch (2-3 threads) perpendicular to the final stitch, but do not pull all the way through so a loop can form.
- Insert the Needle through the loop twice and pull the needle and thread all the way through.
- Repeat on top of previous knot.
- Cut excess thread.
Basic Hand Stitches
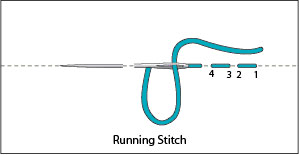
Running Stitch
Purpose: Basting and marking
🎥 Demo: Running Stitch
See how to execute a simple running stitch for basting and marking.
Steps
- Work from right to left.
- Bring your needle up at 1, then down at 2, up at 3, and then down at 4. Continue stitching in that pattern.
- Keep spaces between stitches the same as stitch lengths.
- Keep an even tension and avoid pulling your thread taut, as it will create puckering.
- For speed, gather up several stitches on your needle before pulling them through.
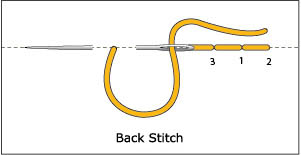
Back Stitch
Purpose: Secure permanent stitching.
🎥 Demo: Back Stitch
See how to execute a Back Stitch for secure, permanent Stitching.
Steps
- Work from right to left.
- Bring your needle up at 1, then back down at 2.
- Move left & bring your needle up at 3, then back down at 1.
- Continue stitching from there.
Whip Stitch Version 1: Hemming Stitch
Purpose: The version known as hemming stitch may be used as a fast and strong form of hemming.
🎥 Demo: Right and Left-Handed Hemming Stitch
See how to sew one variation of Whip Stitch, the Hemming Stitch.
Steps
- Work from right to left.
- Begin by coming from behind fold 1/8 to ¼” from edge. (Pos 1)
- Move approx. 1/4“ to left and pick up 2 or 3 threads on garment at edge of fold (Pos 2)
- Aiming needle perpendicular to hem, come up from behind fold 1/8 to ¼” from edge (Pos 1)
💡Tip: On single layer (garment) only catch 2 threads before going behind fold to catch hem. Remember those stitches will be visible on the right side of the garment.
Whip Stitch Version 2: Overhand
Purpose: The overhand is a fast, strong stitch that can be used to attach 2 pieces together.
🎥 Demo: Overhand Stitch
See how to execute another variation of the Whip Stitch, the Overhand Stitch
Steps
- Work from right to left.
- Matching edges of 2 pieces together, insert needle through both folds 1/16 to 1/8” from edge.
- Move 1/8-¼” to left and repeat, putting needle in perpendicular to fold.
💡Tip: Keep stitches firm, evenly spaced, and close to fold. If you venture too far away from the folded edge, you will create a ridge in the result.
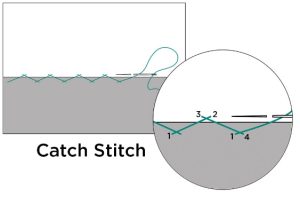
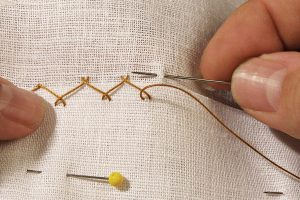
Catch Stitch (Cross Stitch)
Purpose: The Catch Stitch (or Cross Stitch, as we call it in the CMU Shop) is a fast, strong stitch with minimal show on the exterior of the garment. It is commonly used for hems.
🎥 Demo: Right and Left-Handed Cross Stitch
See how to execute the Catch or Cross Stitch, commonly used in the Costume Shop for hems.
Steps
- Work from LEFT to RIGHT. (Left-Handed Stitchers may reverse direction to work from Right to Left.)
- Begin by coming from BEHIND the folded hem ¼”from the edge to hide your knot. (1)
- Moving ¼” to the right and working parallel and right next to the fold, pick up 1-3 threads with your needle – pointing your needle to the LEFT – and pull thread through. (2-3)
- Move ¼” to the right and pick up a small stitch. Again, aim your needle to from right to left, stay ¼” from the fold, and ONLY pick up the top layer of the hem. (4-1)
💡Tip: Keep stitches on garment (single layer side) NO MORE THAN 3 threads. THIS is the stitch that will show on the outside of the garment. Periodically check the right side of the garment to see how you’re doing.
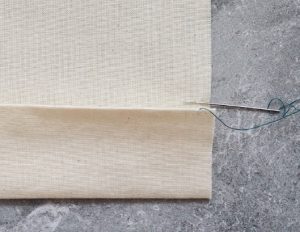
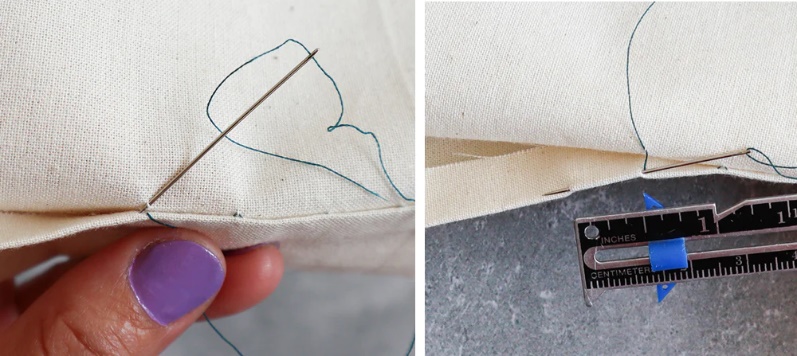
Slip Stitch
Purpose: The slip stitch is used to attach things with no visible stitching (such as applique) or in hems where it would be undesirable to see visible stitching on either outside or inside.
🎥 Demo: Slip Stitch
See how to execute a right or left-handed Slip Stitch to produce a hem with an invisible stitch.
Steps:
- Work from Right to Left.
- This stitch works through a tunneling action. The “tunnel” is the fold at the inner edge of the hem. Your stitches will be traveling through this tunnel and emerging from the fold every ½” to take a tiny catch stitch on the garment before re-entering the tunnel.
- Begin by coming through fold to hide knot.
- Working close to the fold, pick up 1-2 threads on garment.
- Re-enter the fold as close as possible to where you exited.
- Tunnel INSIDE THE FOLD for ½”, emerging slightly to the inside of the fold. This placement helps to hide the stitches in the finished product.
- Pick up 1-2 threads on the garment and re-enter close to exit point.
 |
 |
 |
💡Tips: Use a SINGLE THREAD rather than a doubled thread. A finer – or thinner – needle may be helpful for this stitch.
ASSIGNMENT: Hand Stitching
For each Sampler:
- Use your 8 x 10 muslin pieces, prepared as specified.
- Print the name of the stitch on the sampler, using sharpie or pencil.
- Put into its own plastic page protector.
- Put into binder in listed order.
Supplies
- Black Silamide or sewing thread
- Needle
- Snips
- 7 Prepped Samplers
- (2) pressed in half ‘hot dog’ style (Basting and Backstitch)
- (3) with 1-inch double fold on both long (10”) edges (Hemming/Cross/Slip)
- (2) with 2-inch press-back on long (10” side) (Overhand)
Basting with Running Stitch
- Use 1 of the hot dog style folded samplers. You are now working on a double layer.
- Double your thread and knot.
- Working the long (10”) way, use your ruler to draw a straight line with fabric marker or pencil down the center of the stacked layers on one side
- Optional: use your ruler or hem gauge to make ½ inch hash marks or dots to help guide your stitch lengths.
- Starting from the top or working side (the side you’re looking at) baste the 2 layers together with 1/4″ running stitch, beginning, and ending about 1” from the edge.
- Knot and trim thread.
- Label.
Backstitch
- Use 1 of the hot dog style folded samplers. You are now working on a double layer.
- Double your thread and knot.
- Working the long (10”) way, use your ruler to draw a straight line with fabric marker or pencil 1” from the cut (unfolded) edges on one side.
- Optional: use your ruler or hem gauge to make1/4 inch hash marks or dots to help guide your stitch lengths.
- Starting from the top or working side (the side you’re looking at) backstitch the 2 layers together beginning and ending about 1” from the edge.
- Knot and trim thread.
- Label.
Whip Stitch Variation 2: Overhand
- Use the 2 samplers with the 2” pressed edges.
- Note: the side where you see the fold is the ‘wrong side’ or inside. The other one is the ‘right side’ or outside.
- Put the RIGHT SIDES of the two pieces together, matching the folded edges.
- Use your pins to hold them in place.
- Double your thread and knot.
- Join the 2 folded edges together with overhand stitch, beginning and ending about 1” from the end.
- Knot and trim thread.
- Label.
Whip Stitch Variation 1: Hemming Stitch
- Use one of the 1” double fold samplers. The folded edge is the ‘hem.’ The single layer is the ‘garment.’
- Note: the side where you see the hem is the ‘wrong side’ or inside. The other one is the ‘right side’ or outside.
- Use your pins to hold the hem in place.
- Double your thread and knot.
- Use hemming stitch to complete both ‘hems’.
- Knot and trim thread.
- Label.
Cross Stitch (Catch Stitch)
- Use one of the 1” double fold samplers. The folded edge is the ‘hem.’ The single layer is the ‘garment.’
- Note: the side where you see the hem is the ‘wrong side’ or inside. The other one is the ‘right side’ or outside.
- Use your pins to hold the hem in place.
- Double your thread and knot.
- Use Cross Stitch to complete both ‘hems’.
- Knot and trim thread.
- Label.
Slip Stitch
- Use one of the 1” double fold samplers. The folded edge is the ‘hem.’ The single layer is the ‘garment.’
- Note: the side where you see the hem is the ‘wrong side’ or inside. The other one is the ‘right side’ or outside.
- Use your pins to hold the hem in place.
- Use a single thread and knot the end.
- Use Slip Stitch to complete both hems.
- Knot and trim thread.
- Label.
