3 Fabric Basics
Learning Outcomes
When you finish this chapter you will be able to:
- Recognize and identify the following basic properties of fabric
- Fiber
- Warp and Weft
- Selvage/Selvedge
- Grain, Straight of Grain, Cross Grain, Bias
- Woven vs Knit
- Right vs Wrong Side
- Utilize your knowledge of the above concepts and the snip and rip method to create your samplers
Fiber
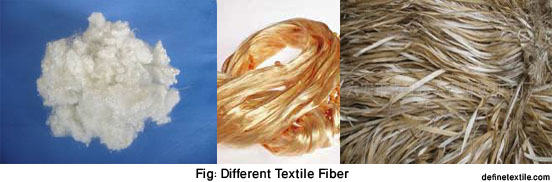
A long, thin strand of material that can be converted into yarns and then knit or woven into a fabric. Fibers may be natural (wool, linen, silk, cotton) or synthetic (polyester, nylon, rayon). Fiber content, construction, and surface finish determine a fabric’s physical properties, utility, and durability. How a fabric looks, feels, drapes, moves, and reflects or absorbs light will determine its effectiveness as a stage costume.
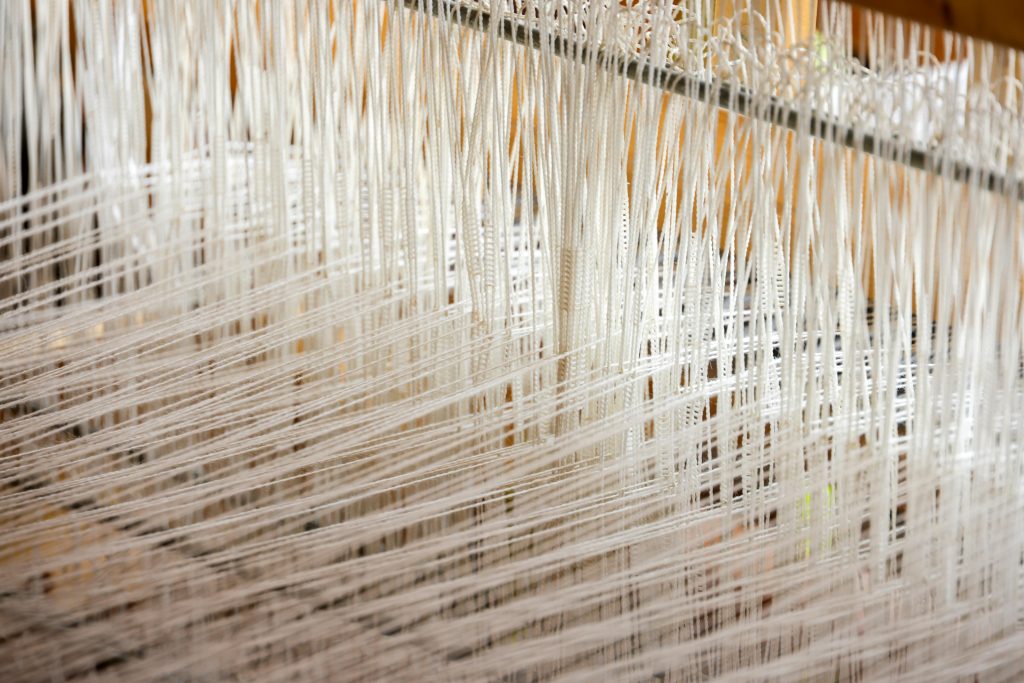
Warp and Weft
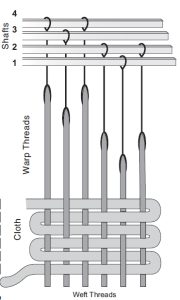
Warp and Weft are the two basic components used in weaving thread or yarn into fabric. The lengthwise or vertical warp yarns are held stationary in tension on a frame or loom, while the horizontal weft yarns and inserted over and under the warp. The edge turns of the wefts will form the Selvage edges of the fabric.
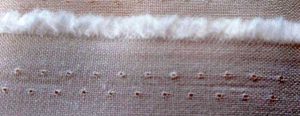
Selvage/Selvedge
 |
 |
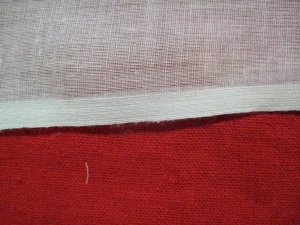 |
The Selvage is the tightly woven edge created by the return action of the weft during the weaving process, which prevents unraveling. It may look like a solid band, be of a distinct color, contain information about the fabric designer and color content, or even have a fringed appearance beyond the edge.
💡Tip:Fabric width is measured from selvage to selvage, while length is measured ALONG the selvage edge. It serves as the reference by which you will find the straight of grain.
Grain
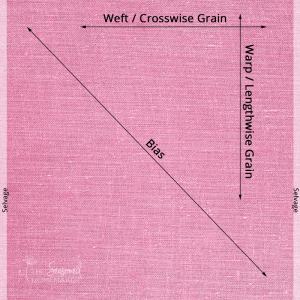
Grain refers to the direction of the warp and weft threads in a fabric.
- Straight Grain is in the direction of the warp threads, lengthwise, or parallel to the selvage. This is the strongest, most stable orientation of the fabric.
- Cross Grain runs in the direction of the weft threads, or perpendicular to the selvage edges. Also strong, but may have mild stretch.
- Bias is at a 45-degree angle from the straight of grain. Pieces cut on the bias have stretch and drape.
Right vs Wrong Side

- The outward-facing side of the fabric, or “face,” is referred to as the “right” side of the fabric. The side intended to be hidden or interior is the “wrong” side.
- Fabrics are marked and patterns pinned to the WRONG side of the fabric, so that the finished garment will, when turned right side out, show the RIGHT side of the fabric.
💡Tip: Although the right side is most often the side where the print, color, or texture is printed or appears most vivid, it is up to the designer to determine which side they want to be outward facing (or RIGHT).
Woven vs Knit
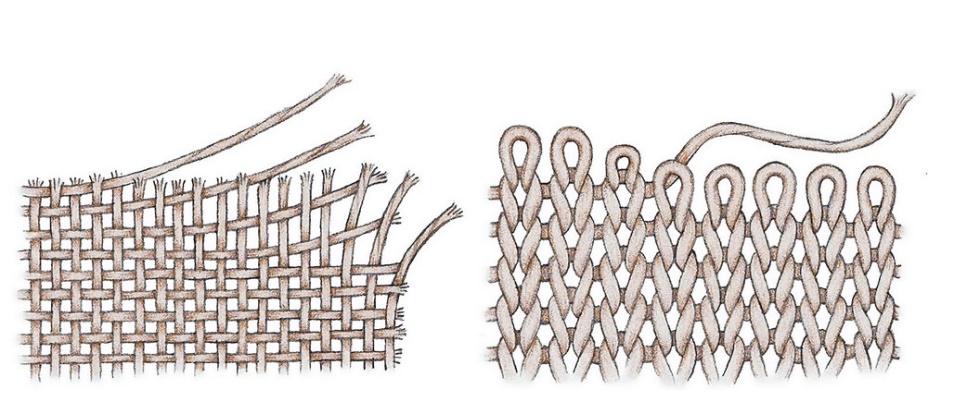
- Woven fabrics are made on a loom in which horizontal and vertical (warp and weft) threads are interlaced at right angles to each other.
- Knits are made from a single thread that is continuously looped in a braided effect. Knits are often (but not always) stretchy.
Measuring, Cutting, and Ripping
Snip and Rip
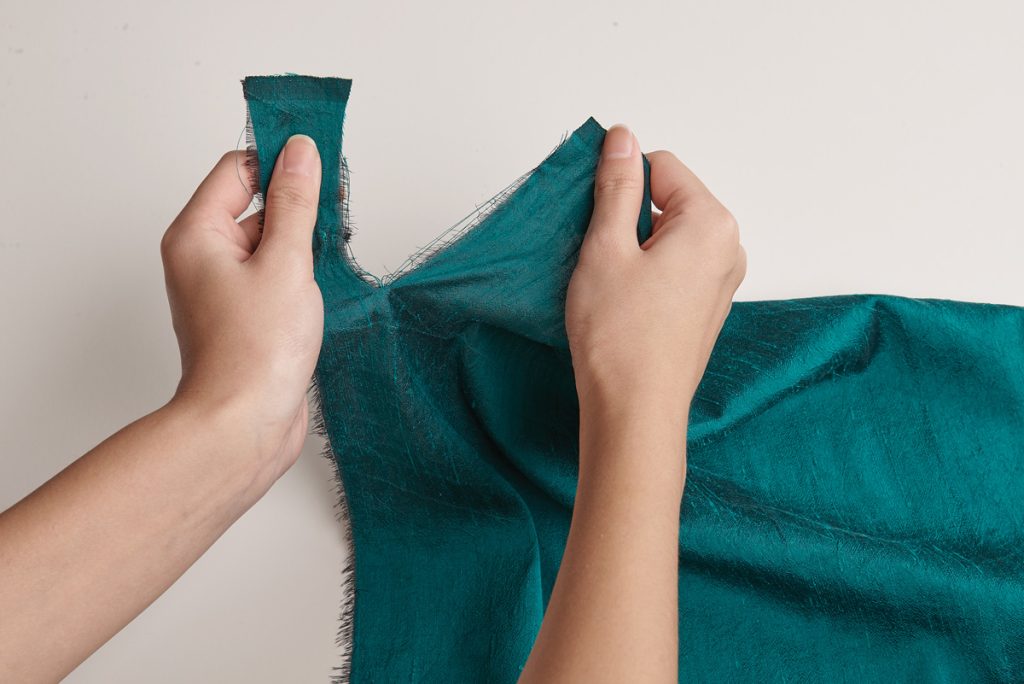
The “snip and rip” method is a technique primarily used in sewing and crafting with woven fabrics to quickly and easily create a straight edge along the grain of the fabric.
How it works:
- Snip: Make a small cut into the fabric along the desired line, ensuring the snip aligns with the fabric’s threads (either warp or weft).
- Rip: Hold the fabric on either side of the snip and quickly pull the fabric apart, causing it to tear along the thread line.
Why use it?
- Straight and Square Edge: Because woven fabric threads run parallel to the edges, ripping along a thread line ensures a straight and square edge, even if you have difficulty cutting with scissors.
- Time-saving: Ripping can be a much faster way to create long, straight edges compared to cutting with scissors.
- Desired effect: In some cases, the frayed edge created by ripping is intentionally desired for a particular project, such as “fray flowers”.
Important considerations:
- Fabric Type: The “snip and rip” method works best on light to medium weight woven fabrics. More textured or tightly woven fabrics may be more difficult to rip and may result in a distorted edge.
- Seam Allowance: If you’re ripping, make sure your seam allowance is large enough to encompass any loose threads that might be created by the ripping process.
- Not recommended for all projects: Avoid using this method on small pieces of fabric or delicate materials where precision is crucial.
🎥 Demo: How to Rip Fabric
See how to use your knowledge of grain to quickly measure and divide fabric by the Snip and Rip method.

Chapter Summary
🧵 Fiber: Natural = cotton, wool, silk, linen | Synthetic = polyester, nylon
📐 Grain:
Straight Grain: strongest, parallel to selvage
Cross Grain: perpendicular to selvage
Bias: 45° angle, drapey/stretchy
✂ Cutting Tips:
Use snip & rip for straight edges on lightweight woven fabric
Align pieces on straight grain for stability
💡Tip: Your knowledge of fabric structure and cutting techniques helps transform raw material into costumes that serve the storytelling, support the actor’s movement, and fulfill the designer’s creative vision.
ASSIGNMENT: PROPERTIES OF FABRIC
Tools and Supplies
- Muslin
- Tape Measure
- 18″ clear plastic ruler
- Fabric marker or pencil
- Sharpie
- Fabric Scissors
1. Utilize the snip and rip method to create forty (40) 8″ x 10″ samplers with the 10″ side on the straight of grain.
- Prepare your fabric by pressing if necessary
- Identify the Selvage
- Measure the width of your fabric (from selvage to selvage) to estimate how many 8″ pieces will fit. Allow for the fact that some fabric will be lost in the ripping process. From there, calculate how many rows of that number you will need to cut. Ex: if your fabric is 45 inches wide, you can fit five 8″ pieces across (with some extra left over). Therefore, you will need to cut 8 rows to end up with 40 samplers.
- Using your ruler or tape measure, measure ALONG the selvage and mark every 10″ for as many rows as you have calculated you will need.
- Snip and Rip your rows from selvage to selvage
- Measure and mark along your torn edge every 8″.
- Snip and rip along the straight of grain.
- For future reference, remember that your Straight of Grain will always be parallel to the 10″ side of your samplers.
2. Identifying Grain
- Choose a sampler piece with a selvage.
- Press and remove ragged threads.
- Using your clear ruler and pencil or fabric marker, draw a line indicating each of the following and label with appropriate terminology:
- Straight of grain
- Cross Grain
- Bias
- Selvage
- Warp
- Weft
3. Identifying Knit Vs Woven
- Peruse the costume shop fabric stock. Identify a knit and a woven fabric (NOT your sampler fabric). Take an approximately 4 x 4 swatch of each by measuring with your ruler and being sure to cut from the end of the bolt.
- Label with sharpie.
4. Store your samplers with kit and other materials. Put your labeled pieces into page protectors in your Sampler Binder.
