3 Module Three: Project Planning and Scheduling
Module Three: Project Planning and Scheduling
Module Learning Objectives
- Identify the key elements of planning a project. (CLO 2)
- Identify types of building drawings and what they contain. (CLO 1)
- Apply the basics of scheduling and solve the critical path in a schedule of predetermined activities. (CLO 2)
- Identify elements from a building drawing. (CLO 1, 2)
Module Essential Questions
- What are the fundamental elements involved in effectively planning a project, and how do they contribute to its success? (CLO 2)
- What are the different types of building drawings, and what specific information do they typically contain? (CLO 1)
- How can the basics of scheduling be applied to manage project timelines, and how does solving the critical path contribute to efficient project execution? (CLO 2)
- What specific elements can be identified from a building drawing, and how do they aid in understanding and executing construction projects? (CLO 1, 2)
Bridge-In
The Planning Phase: The Longest and Most Critical Stage
The planning phase stands as the cornerstone of project management, defining the full scope, cost, and schedule of the project in meticulous detail.
Key Inputs:
- Project Charter & Objectives: The guiding documents that outline the project’s goals and initial parameters.
- Data from the Business Case: Financial and strategic information that supports the project’s feasibility and importance.
This stage involves a comprehensive examination of the project’s requirements, ensuring a thorough understanding of what success looks like and the path to achieve it. Objectives during this phase are to establish specific and measurable results, and set clear targets for the project’s outcome.
Critical Outputs:
- Scope of Work (SOW): A document that clearly defines what needs to be accomplished in the project.
- Schedule: A detailed timeline of project activities, milestones, and deadlines.
- Budget: An itemized forecast of the costs associated with the project.
- Drawings and Specifications: Visual and written documents that detail the design and standards the project must meet.
- Contract for Implementation: A formal agreement outlining the terms, conditions, and scope of work between the project owner and the contractor.
- Scheduling for Project: Plans that allocate resources and timelines to each task, ensuring efficient progress towards project milestones.
Planning Essentials
Key Steps in Project Planning:
- Identify the Need: Recognizing the primary objectives and requirements of the project.
- Determine Budget and Completion Date: Establishing financial limits and timelines.
- Build Team: Assembling a group of professionals capable of bringing the project to fruition.
- Monitor Progress: Ensuring the project stays on course through vigilant oversight.
Deep Dive into Planning and Scope
- Focus on Deliverables: Starting with the end in mind to define the necessary steps and resources.
- Risk and Quality Analysis: Evaluating potential challenges and standards to ensure the project’s success.
- Communication Plan: Strategizing on how to keep all stakeholders informed and engaged.
The Role of Design and Drawings
- Architects and Engineers: The creative minds translating project goals into tangible plans.
- Importance for Cost Estimating: Utilizing drawings to forecast financial requirements accurately.
Summary
This module brings to light the vital components of planning in the construction management process, from conceptualizing the project’s scope and design to preparing for execution. Understanding these elements is crucial for developing a cohesive and effective strategy that aligns with the project’s goals and constraints.
Lesson 1: Planning for Construction
While gaining initial approval is the first gateway to determine if a project should move forward, the planning phase is critical to the success of the entire project as well as ensuring the goals of the client are met. Proper planning can be one of the most time-consuming aspects of our project, but it is the most important.
Project planning is central to project management. The building drawings and specifications can tell us what to build, but they don’t tell us how we’re going to get there. For this, we need to really get into planning and scheduling. Planning takes place at all stages. When owners want a new facility, they put together a plan to acquire what they need. Successive participants in the process – designers, contractors, material suppliers – all plan, often with much greater detail but limited scope, in order to execute their part of the project.
Planning is the process of devising a workable scheme of operations that, when put into action, will accomplish an established objective. It is the most time-consuming aspect but is also the most important. It requires an intimate knowledge of construction methods combined with the ability to visualize discrete work elements and establish their mutual interdependencies.
Strategic Planning and Project Programming
The programming of capital projects is shaped by the strategic plan of an organization, which is influenced by market demands and resource constraints. The programming process associated with planning and feasibility studies sets the priorities and timing for initiating various projects to meet the overall objectives of the organizations. However, once this decision is made to initiate a project, market pressure may dictate early and timely completion of the facility.
Among various types of construction, the influence of market pressure on the timing of initiating a facility is most obvious in industrial construction. Demand for an industrial product may be short-lived, and if a company does not hit the market first, there may not be demand for its product later. With intensive competition for national and international markets, the trend of industrial construction moves toward shorter project life cycles, particularly in technology-intensive industries.
To gain time, some owners are willing to forego thorough planning and feasibility studies so as to proceed on a project with inadequate definition of the project scope. Invariably, subsequent changes in project scope will increase construction costs; however, profits derived from earlier facility operations often justify the increase in construction costs. Generally, if the owner can derive reasonable profits from the operation of a completed facility, the project is considered a success even if construction costs far exceed the estimate based on an inadequate scope definition. This attitude may be attributed in large part to the uncertainties inherent in construction projects. It is difficult to argue that profits might be even higher if construction costs could be reduced without increasing the project duration. However, some projects, notably some nuclear power plants, are clearly unsuccessful and abandoned before completion, and their demise must be attributed at least in part to inadequate planning and poor feasibility studies.
The owner or facility sponsor holds the key to influencing the construction costs of a project because any decision made at the beginning stage of a project life cycle has far greater influence than those made at later stages, as shown schematically in Figure 3.1. Moreover, the design and construction decisions will influence the continuing operating costs and, in many cases, the revenues over the facility’s lifetime. Therefore, an owner should obtain the expertise of professionals to provide adequate planning and feasibility studies. Many owners do not maintain an in-house engineering and construction management capability, and they should consider the establishment of an ongoing relationship with outside consultants in order to respond quickly to requests. Even among those owners who maintain engineering and construction divisions, many treat these divisions as reimbursable, independent organizations. Such an arrangement should not discourage their legitimate use as false economies in reimbursable costs from such divisions can indeed be very costly to the overall organization.

Finally, the initiation and execution of capital projects place demands on the resources of the owner and the professionals and contractors to be engaged by the owner. For very large projects, it may bid up the price of engineering services as well as the costs of materials and equipment and the contract prices of all types. Consequently, such factors should be taken into consideration in determining the timing of a project.
Example 3.1 Setting priorities for projects
A department store planned to expand its operation by acquiring 20 acres of land in the southeast of a metropolitan area which consists of well-established suburbs for middle-income families. An architectural/engineering (A/E) firm was engaged to design a shopping center on the 20-acre plot with the department store as its flagship plus a large number of storefronts for tenants. One year later, the department store owner purchased 2,000 acres of farmland in the northwest outskirts of the same metropolitan area and designated 20 acres of this land for a shopping center. The A/E firm was again engaged to design a shopping center at this new location.
The A/E firm was kept completely in the dark while the assemblage of the 2,000 acres of land in the northwest quietly took place. When the plans and specifications for the southeast shopping center were completed, the owner informed the A/E firm that it would not proceed with the construction of the southeast shopping center for the time being. Instead, the owner urged the A/E firm to produce a new set of similar plans and specifications for the northwest shopping center as soon as possible, even at the sacrifice of cost-saving measures. When the plans and specifications for the Northwest shopping center were ready, the owner immediately authorized its construction. However, it took another three years before the southeast shopping center was finally built.
The reason behind the change of plan was that the owner discovered the availability of the farmland in the northwest which could be developed into residential real estate properties for upper-middle-income families. The immediate construction of the northwest shopping center would make the land development parcels more attractive to home buyers. Thus, the owner was able to recoup enough cash flow in three years to construct the southeast shopping center in addition to financing the construction of the northeast shopping center, as well as the land development in its vicinity.
While the owner did not want the construction cost of the northwest shopping center to run wild, it was satisfied with the cost estimate based on the detailed plans of the southeast shopping center. Thus, the owner had a general idea of what the construction cost of the northwest shopping center would be and did not wish to wait for a more refined cost estimate until the detailed plans for that center were ready. To the owner, the timeliness of completing the construction of the Northwest shopping center was far more important than reducing the construction cost in fulfilling its investment objectives.
Pre-Project Planning
Even before design and construction processes begin, there is a stage of “pre-project planning” that can be critical for project success. In this process, the project scope is established. Since construction and design professionals are often not involved in this project scope stage, the terminology of describing this as a “pre-project” process has arisen. From the owner’s perspective, defining the project scope is just another phase in the process of acquiring a constructed facility.
The definition of a project scope typically involves developing project alternatives at a conceptual level, analyzing project risks and economic payoff, developing a financial plan, making a decision to proceed (or not), and deciding upon the project organization and control plan. The next few chapters will examine these different problems at some length.
The danger of poor project definition comes from escalating costs (as new items are added) or, in the extreme, project failure. A good definition of scope allows all the parties in the project to understand what is needed and to work towards meeting those needs.
Example 3.2 The Project Definition Rating Index (PDRI) for Building Projects
The Construction Industry Institute has developed rating indexes for different types of projects to assess the adequacy of project scope definitions. These are intended to reflect best practices in the building industry and provide a checklist for recommended activities and milestones to define a project scope. The rating index is a weighted sum of scores received for a variety of items on the scope definition checklist. Each item in the checklist is rated as “not applicable” (0), “complete definition” (1), “minor deficiencies” (2), “some deficiencies” (3), “major deficiencies” (4) or “incomplete or poor definition” (5). Lower scores in these categories are preferable. Some items on the checklist include:
- Business Strategy for building use, justification, plan, economic analysis, facility requirements, expansion/alteration consideration, site selection issues and project objectives.
- Owner Philosophy with regard to reliability, maintenance, operation and design.
- Project Requirements for value engineering, design, existing facility, scope of work review, schedule and budget.
- Site Information including applicable regulatory reporting and permit requirements.
- Building Programming including room by room definitions for use, finishes, interior requirements and HVAC (heating, ventilating and air conditioning).
- Design Parameters including all components and a constructability analysis.
- Equipment including inventory, locations and utility requirements.
Construction Planning
The development of a construction plan is very much key to the development of a good facility design. The planner must weigh the costs and reliability of different options while at the same time ensuring technical feasibility. Construction planning is more difficult in some ways since the building process is dynamic as the site and the physical facility change over time as construction proceeds. On the other hand, construction operations tend to be fairly standard from one project to another, whereas structural or foundation details might differ considerably from one facility to another.
Construction planning, as well as scheduling, must be done by people who are experienced in and thoroughly familiar with the type of fieldwork involved. Significant learning takes place during the planning phase of a project. Therefore, the people doing the planning are in the best position to manage the work. The project network and management data obtained will be realistic and useful only if the job plan is produced and updated by those who understand the job to be done, the ways in which it can be accomplished, and the job site conditions. Those executing the work in the field are most likely to be committed to ensuring the work is done according to the plan if they participate in the planning process.
To construct the job network plan, information must be sought from many sources. Guidance from key personnel involved with the project, such as estimators, the project manager, the site superintendent, and the field engineer, can be obtained from a planning meeting or perhaps a series of meetings. The network serves as a medium whereby the job plan can be reviewed, criticized, modified and improved. As problems arise, consultations with individuals can clear up specific questions. The important point here is the need for full group participation in the development of the network, and collective views must be solicited.
Participation by key subcontractors and suppliers is also vital to the development of a workable plan. Normally, the prime contractor sets the general timing reference for the overall project. Individual subcontractors then review the portions of the plan relevant to their work and help develop additional details pertaining to their operations. An important side effect is that this procedure brings subcontractors and the prime contractor together to discuss the project. Problems are detected early, and steps toward their solutions are started well in advance.
From the standpoint of construction contractors or the construction divisions of large firms, the planning process for construction projects consists of three stages that take place between the moment in which a planner starts the plan for the construction of a facility to the moment in which the evaluation of the final output of the construction process is finished.
The estimate stage involves the development of a cost and duration estimate for the construction of a facility as part of the proposal of a contractor to an owner. It is the stage in which assumptions of resource commitment to the necessary activities to build the facility are made by a planner. A careful and thorough analysis of different conditions imposed by the construction project design and by site characteristics is taken into consideration to determine the best estimate. The success of a contractor depends upon this estimate, not only to obtain a job but also to construct the facility with the highest profit. The planner has to look for the time-cost combination that will allow the contractor to be successful in his commitment. The result of a high estimate would be to lose the job, and the result of a low estimate could be to win the job but to lose money in the construction process. When changes are done, they should improve the estimate, taking into account not only present effects but also future outcomes of succeeding activities. It is very seldom the case in which the output of the construction process exactly echoes the estimate offered to the owner.
In the monitoring and control stage of the construction process, the construction manager has to keep constant track of both activities’ durations and ongoing costs. It is misleading to think that if the construction of the facility is on schedule or ahead of schedule, the cost will also be on the estimate or below the estimate, especially if several changes are made. Constant evaluation is necessary until the construction of the facility is complete. When work is finished in the construction process, and information about it is provided to the planner, the third stage of the planning process can begin.
The evaluation stage is the one in which the results of the construction process are matched against the estimate. A planner deals with this uncertainty during the estimate stage. Only when the outcome of the construction process is known is he/she able to evaluate the validity of the estimate. It is in this last stage of the planning process that he or she determines if the assumptions are correct. If they were not or if new constraints emerge, he/she should introduce corresponding adjustments in future planning.
It must be recognized that the project plan represents the best thinking available at the time it is conceived and implemented. However, no such scheme is ever perfect, and the need for change is inevitable as the work progresses. Insight and greater job knowledge are acquired as the project evolves. This increased cognizance necessarily results in corrections, refinements and improvements to the operational plan. The project program must be viewed as a dynamic device that is continuously modified to reflect the progressively more precise thinking of the field management team.
Test your knowledge!
What is the primary purpose of the project charter in the planning phase of a construction project?
Lesson 2: Risk Management in Construction
There are no guarantees on any project. Even the simplest activity can turn into unexpected problems. As we are planning the project, one of the major things we are doing is thinking about all the things that could happen to affect our project, either positively or negatively. Anything that might occur to change the outcome of a project activity, we call that a risk. A risk can be an event (like a snowstorm) or it can be a condition (like an important part being unavailable). Either way, it’s something that may or may not happen but if it does, then it will force you to change the way you and your team work on the project. It is such a big deal in project management, that it has its own competency in the PM Book of Knowledge (PMBOK). We want to perform risk planning and management here in the planning phase of our project to identify these problems, analyze their impact on our project, develop methods to deal with these risks, and then put them into a risk register we can then monitor throughout the project cycle.
Risk management in construction is a critical practice that involves identifying, analyzing, and responding to any potential risks that might impact a project’s timeline, budget, quality, or overall success. In the inherently uncertain environment of construction, where projects are subject to a myriad of variables and external influences, effective risk management becomes indispensable.
At its core, risk management aims to minimize the negative impacts of potential threats while maximizing the opportunities that may arise during the project lifecycle. It encompasses a systematic approach to foreseeing risks that could affect the project, assessing their likelihood and potential impact, and devising strategies to handle them efficiently.
Understanding Risk: Delving into the nature of risk in construction, emphasizing its dual nature of uncertainty and opportunity.
Analyzing Risk: Mastering the art of risk assessment through a detailed examination of its components.
Dealing with Risk: Exploring comprehensive strategies for risk response, tailored to the unique challenges of construction projects.
Developing a Risk Management Plan: Crafting a dynamic and effective plan to manage risks throughout project execution.
What is Risk?
Risk in construction projects encapsulates the potential deviation from expected outcomes, underscoring the inherent uncertainties in project management. This section elucidates the concept of risk, distinguishing between its negative connotations and its potential as an opportunity for unexpected benefits. Through understanding risk, project managers can better prepare for and navigate the complexities of construction projects.
Analyzing Risk
A robust risk analysis process is pivotal in construction management. The methodology of evaluating risk includes:
- Likelihood and Impact: Quantifying the probability of risk occurrence and its potential consequences on project objectives.
- Speed of Onset and Complexity: Assessing how quickly risks can materialize and the complexity of their interrelations and potential cascading effects.
- Degree of Control and Confidence in Assessment: Evaluating the extent to which risks can be controlled or influenced and the reliability of the risk assessment process.
Dealing with Risk Effectively
Effective risk management in construction necessitates a strategic approach to responding to identified risks. Risk response strategies include:
- Avoidance: Techniques for eliminating the possibility of risk occurrence.
- Acceptance: Acknowledging certain risks as part of the project’s fabric and planning accordingly.
- Prevention and Mitigation: Implementing measures to reduce either the likelihood or the impact of risks.
- Transfer: Strategies for shifting risk to other parties, such as through insurance, to safeguard the project from potential disruptions.
Risk Management Plan in Construction
In the dynamic and often unpredictable field of construction, effective risk management is crucial for the success and timely completion of projects. A comprehensive Risk Management Plan (RMP) serves as a blueprint for identifying, assessing, and mitigating risks throughout the lifecycle of a construction project. It ensures that potential problems are addressed proactively rather than reactively, saving time, resources, and safeguarding the project’s objectives.
Key Components of a Risk Management Plan:
- Risk Identification: Systematic identification of potential risks that could negatively impact the project. This includes risks related to project scope, resources, environmental factors, and external events.
- Risk Analysis: Once risks are identified, they are analyzed to determine their potential impact and likelihood of occurrence. This analysis helps in prioritizing risks based on their severity.
- Risk Response Planning: Developing strategies to address each risk, which can include avoidance, mitigation, transfer, or acceptance.
- Implementation of Risk Responses: Executing the planned responses to manage or mitigate risks.
- Monitoring and Review: Continuous monitoring of risks and the effectiveness of response strategies, with adjustments made as necessary.
Sample Risk Management Plan
Illustrating the application of risk management theories, this segment presents a sample plan that outlines:
- Specific Risks: Identifying typical and atypical risks encountered in construction projects.
- Assessment Results: Present a structured analysis of each risk’s likelihood, impact, and other relevant factors.
- Response Strategies: Detailing tailored responses to mitigate or leverage risks effectively.
Sample Risk Management Plan for a Construction Project
Project Name: Greenfield Commercial Development
Project Manager: Jane Doe
Date: 01/01/01
1. Project Overview
The Greenfield Commercial Development project aims to construct a new, environmentally friendly commercial building in Downtown Cityville, with completion targeted within 18 months. The project includes site preparation, construction of the main building, landscaping, and interior finishing.
2. Risk Identification
2.1 Specific Risks:
- Weather Delays (Risk ID: W01): Unexpected severe weather conditions delaying construction phases.
- Supply Chain Disruptions (Risk ID: SCD02): Delays in material deliveries due to supply chain issues.
- Permit and Regulatory Changes (Risk ID: PRC03): New or revised regulations affecting project scope or schedule.
- Labor Shortages (Risk ID: LS04): Difficulty in securing skilled labor leading to delays or increased costs.
- Design Flaws (Risk ID: DF05): Potential rework due to errors in the initial design phases.
3. Risk Analysis
3.1 Assessment Results:
| Risk ID | Likelihood | Impact | Speed of Onset | Degree of Control |
|---|---|---|---|---|
| W01 | High | Medium | Fast | Low |
| SCD02 | Medium | High | Moderate | Medium |
| PRC03 | Low | High | Slow | High |
| LS04 | Medium | Medium | Moderate | Medium |
| DF05 | Low | High | Slow | High |
4. Risk Response Strategies
4.1 Response Plans:
- Weather Delays (W01)
- Strategy: Mitigation through flexible scheduling and securing weather-protective equipment.
- Actions: Develop an adaptive project schedule that allows shifting of indoor tasks during bad weather.
- Supply Chain Disruptions (SCD02)
- Strategy: Transfer and Mitigation by diversifying suppliers and ordering critical materials in advance.
- Actions: Establish contracts with multiple suppliers; stockpile essential materials.
- Permit and Regulatory Changes (PRC03)
- Strategy: Acceptance and Prevention by staying informed on regulatory changes and engaging a legal consultant.
- Actions: Monthly review of regulatory landscape; regular consultations with a construction-focused legal team.
- Labor Shortages (LS04)
- Strategy: Mitigation through training programs and partnerships with local trade schools.
- Actions: Develop an in-house training program for semi-skilled workers; establish an internship program.
- Design Flaws (DF05)
- Strategy: Prevention by implementing a rigorous design review process and utilizing advanced modeling software.
- Actions: Conduct periodic design reviews with all stakeholders; invest in state-of-the-art design and simulation tools.
5. Monitoring and Review
- Continuous Monitoring: Assign a risk management officer to monitor identified risks and report to the project management team weekly.
- Review Schedule: Conduct a formal risk review meeting every month to assess the effectiveness of risk response strategies and to identify any new risks.
6. Conclusion
This sample risk management plan outlines a structured approach to anticipating, understanding, and mitigating risks in the Greenfield Commercial Development project. By systematically identifying, analyzing, and planning for potential risks, the project team can enhance its preparedness, ensuring that the project remains on track toward successful completion despite the uncertainties inherent in construction projects.
Probability and Impact Matrix in Risk Management Plans
At the heart of risk analysis in construction management is the Probability and Impact Matrix (PIM). This tool is essential for evaluating and prioritizing risks, facilitating informed decision-making and strategic planning.
How the Probability and Impact Matrix is Done:
- Setting Up the Matrix: The PIM is a grid with two axes: probability (likelihood of occurrence) and impact (potential effect on project objectives). Each axis is typically divided into three levels: low, medium, and high.
- Assigning Risks: Each identified risk is placed on the matrix based on its assessed probability and impact. This visual representation helps stakeholders understand the risk landscape of the project at a glance.
- Prioritization: Risks in the high-probability/high-impact quadrant are prioritized for response planning, as they pose the greatest threat to the project.
The Role of the Probability and Impact Matrix:
- Facilitates Prioritization: By categorizing risks based on their severity, the PIM helps project teams focus on the most critical risks first, ensuring efficient allocation of resources.
- Improves Communication: The visual nature of the PIM makes it an excellent tool for communicating the risk profile of a project to all stakeholders, including team members, clients, and investors.
- Supports Strategic Planning: Understanding the probability and impact of risks enables more informed strategic planning, from initial project planning stages through to completion.
- Dynamic Risk Management: The PIM is not a static tool; it is regularly updated throughout the project lifecycle to reflect new risks and changes in the risk landscape. This ensures that the RMP remains relevant and effective.
How to make a Probability and Impact Matrix in Excel
Conclusion
A Risk Management Plan, anchored by the use of a Probability and Impact Matrix, is indispensable in construction projects. It not only helps in identifying and prioritizing risks but also plays a critical role in devising effective strategies to mitigate these risks. By systematically analyzing probability and impact, construction managers can navigate the complexities of their projects with greater confidence, ensuring that risks are managed proactively and that the project is positioned for success.
Activity 3.1: Probability and Impact Matrix Exercise
Context: Understanding risk management is a crucial component of planning in any project. While the textbook has introduced the foundational concepts of risk management, this task will provide a practical application using a real-world scenario: A concourse addition for a major airport This exercise focuses on creating a Probability and Impact Matrix, a tool not covered in detail in the readings but essential for visualizing and prioritizing risks.
Objective: By completing this task, you will deepen your understanding of risk identification, evaluation, and mitigation strategies in the context of a significant infrastructure project.
Instructions:
- Identify Risks:
- Reflect on the major project described – A concourse addition for a major airport.
- Brainstorm and document at least ten potential risks that could impact the success of this project. Consider factors such as construction delays, budget overruns, technological failures, supply chain disruptions, and environmental impacts.
- Create Your Matrix:
- Using a blank page or digital drawing tool, create a Probability and Impact Matrix. This matrix should have two axes: one for the probability of each risk occurring (low, medium, high) and another for the impact (low, medium, high) if the risk were to materialize.
- Place each identified risk within the matrix according to your assessment of its probability and impact.
- Mitigation Strategies:
- For each risk, think of at least one mitigation strategy that could either reduce the probability of the risk occurring or lessen its impact on the project. If a strategy addresses both, note this as well.
- Use a different color or symbol to denote these mitigation strategies on your matrix.
- Reflection and Adjustment:
- Reflect on how implementing your identified mitigation strategies would change the position of each risk on the matrix. Would the probability decrease? Would the impact be lessened?
- Adjust the position of each risk on your matrix based on your mitigation strategy, moving them to the left (to reflect reduced probability), downward (to reflect reduced impact), or both.
- Document and Share:
- Capture your completed Probability and Impact Matrix with a brief explanation of your mitigation strategies. If you’re completing this task as part of a classroom assignment, follow your instructor’s guidance for sharing your work, such as posting to a course forum or digital classroom space.
- Discussion:
- Be prepared to discuss your matrix and the rationale behind the placement and adjustment of risks. Consider how your mitigation strategies could be applied in real-world project management and what challenges might arise in implementing these strategies.
Lesson 3: Building Drawings
In this lesson, we will dive into a rapid tutorial on deciphering construction drawings. Grasping the layout of the site and piecing together a coherent project plan—encompassing estimates and schedules—hinges on our ability to comprehend the details presented in these drawings. They serve as the blueprint for our planning process, laying the groundwork for cost quantification and acting as a pivotal reference for contractors to pinpoint where their tasks will unfold.
Building drawings, also known as blueprints or plans, are the universal language of the construction industry. These documents contain all the necessary information to guide the construction of a building, from the foundational layout to the finishing touches. This lesson will explore the critical elements of building drawings, providing insights into how to interpret and utilize these plans effectively.
Cover and Block Information
The cover sheet of building drawings provides an overview of the project at a glance. It typically includes:
- Project Title and Location: The name of the building project and its geographical location.
- Date, Revision Dates, and Scale: Initial drafting date, any subsequent revision dates, and the scale used in the drawings.
- Project Team Information: Names and contact information of the architects, engineers, and contractors involved.
- Index of Drawings: A list of all the drawings included in the set, organized by discipline.
Drawing Views
Building drawings are composed of several standard views that offer different perspectives of the building:
- Plan View: A horizontal cut through the structure, providing a bird’s-eye view of the layout.
- Elevation View: Shows the exterior or interior walls of the building from a straight-on view.
- Section View: A vertical cut through the structure, offering a side view that reveals the interior components.
- Detail View: Zooms in on specific elements or construction techniques, providing a close-up perspective.
Types of Drawings
A complete set of building drawings encompasses various disciplines, each focusing on a different aspect of the construction:
- Architectural Drawings: Outline the design and aesthetic elements of the building, including layout, space planning, and materials.
- Structural Drawings: Detail the structural components and systems that support the building, such as beams, columns, and foundations.
- Mechanical Drawings: Focus on the heating, ventilation, and air conditioning (HVAC) systems.
- Electrical Drawings: Map out the electrical systems, including wiring, outlets, and panel schedules.
- Plumbing Drawings: Illustrate the plumbing system, including water supply and waste lines.
- Fire Protection Drawings: Show the layout and components of fire suppression systems.
- Civil Site Drawings: Provide information on site preparation, landscaping, and infrastructure outside the building itself.
Key Drawings Aspects
Activity 3.2 Building Drawing Scavenger Hunt
In this digital twist on the classic scavenger hunt, you’ll use the use the ABC Warehouse Drawings to find answers within a set of building drawings.
You’ll uncover:
- How many overhead lights are in each office?
- How many restrooms are on the premises?
- How many square feet (SF) is their conference room?
- What percentage of the total area of the warehouse is the office area?
- What is the size of the exterior signage?
- How tall is the building running north/south?
- Is the premises sprinklered (does it have a fire sprinkler system)?
- How many offices are on a single power circuit?
- What is the address of the warehouse?
- What is the address of the architecture firm?
- What is the brand of fan used in the warehouse?
Each correct answer will bring you closer to becoming a proficient reader of construction drawings.
Activity 3.3 Drawing Specialists Challenge
For those looking to deepen their skills after Activity 3.2, this challenge offers a chance to further refine your skills with the ABC Warehouse Drawings. Feel free to complete the following tasks at your own pace. You may return to them as you wish or choose to complete only some—whichever works best for you.
Materials Needed
- ABC Warehouse Drawings.
- A notebook or digital device for notes.
- Ruler or digital measuring tool for understanding scales and dimensions.
Tasks
- How far up the wall does the ceramic tile go in the bathrooms?
- Find where “Safety Glass” is used, its dimensions, and its purpose.
- Identify the “Warehouse Entry” dock doors on the plan and note their sizes.
- Determine Room 110’s purpose and its door size from the drawing.
- How many electrical panels supply this building?
- Identify the partition type, width, and finish type for the walls between offices.
- Locate the “Janitor’s” room from the Drawing and Schedules and describe its specified details.
- Review the Door Schedule to find dimensions and materials for “Office” doors.
- Identify what type of power (phasing and voltage) is needed for the Unit heaters in the warehouse.
- Describe the purpose of Group 1 hardware as mentioned in the Hardware Schedule and its application.
Additional Resources on Building Drawings
The following are some additional optional resources to review if you’d like to learn more about building drawings. The first two are LinkedIn Learning modules, one is a YouTube channel on virtual design and construction, and the last is sample drawing sets and references about line types used in building drawings that could be useful.
Resources
- LinkedIn Learning – Reading Civil Construction Drawings
- LinkedIn Learning – Reading Drawings and Specifications
- I also found a great YouTube channel with a virtual design and construction trainer that has some great videos to introduce you to various concepts and terminologies. YouTube – VDCI cadteacher
- These are some great sample drawings to reference and work with the two LinkedIn learnings above: Sample Drawings -Residential [PDF]
- This is a great reference for reading drawings and has some good call-outs to know: Line Type Key [PDF]
Lesson 4: Scheduling and Critical Path Method
We’ve talked a bit about how proper planning can be one of the most time-consuming aspects of our project, but also the most important. Part of this planning process is developing a detailed schedule of the work planned. This helps us to better understand what needs to be accomplished and when, and sets us up to better understand the resources required.
Introduction to Construction Scheduling
Construction scheduling stands as a cornerstone of project management, ensuring projects are executed efficiently, within budget, and on schedule. It starts with a profound understanding of project deliverables, breaking these down into smaller, more manageable components, and meticulously planning the sequence of activities required to achieve project goals.
Basics of Scheduling
Scheduling in construction management is a systematic process that begins with the identification of project deliverables. Each deliverable is decomposed into smaller, measurable tasks known as work packages. These packages are then meticulously assigned with time estimates, costings, and the necessary resources. To further refine the planning process, each task is analyzed to identify its prerequisites or predecessors. This culminates in the creation of a network diagram, which serves as a visual map of the project schedule, elucidating the sequential and parallel paths of task execution.
The Work Breakdown Structure (WBS)
Central to effective scheduling is the Work Breakdown Structure (WBS), a methodical breakdown of the project into single, measurable units of work. This hierarchical representation ensures comprehensive coverage of the project scope, delineating responsibilities and timelines.

Characteristics of a Good WBS:
- Hierarchical Organization: Segments project work into manageable sections for better control.
- Measurable Tasks: Facilitates tracking and assessment of progress.
- Single Entity Responsibility: Assigns each task to a specific team or individual for accountability.
- Distinct Time Periods: Defines clear start and end dates for each task, aligning with project milestones.
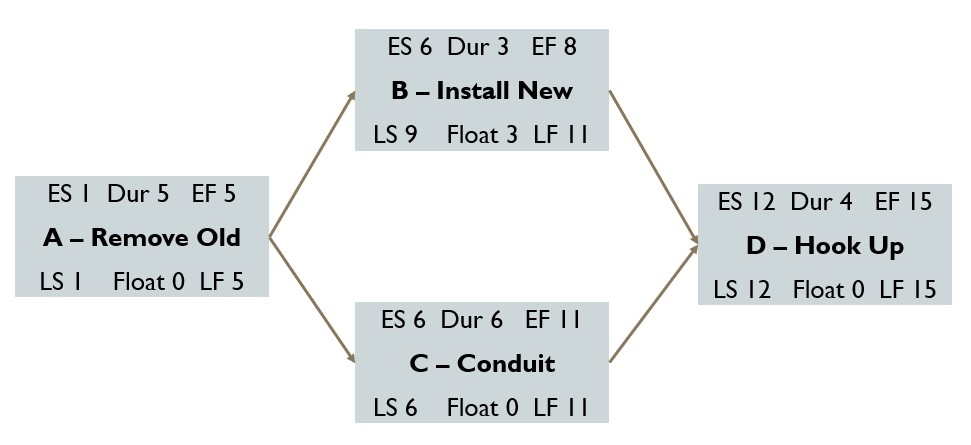
Network Diagram and Critical Path Method (CPM)
Upon establishing the work packages through the WBS, attention shifts to the network diagram, which visualizes these tasks along with their respective durations. This diagram is instrumental in conducting:
- Forward Pass: A calculation method to ascertain the earliest start and finish times for all tasks, mapping out the optimal project timeline.
- Backward Pass: A technique to determine the latest start and finish times that tasks can be completed without delaying the project, offering insights into scheduling flexibility.
- Float or Slack Calculation: Identifies the leeway in delaying tasks without affecting subsequent tasks or the overall project deadline.
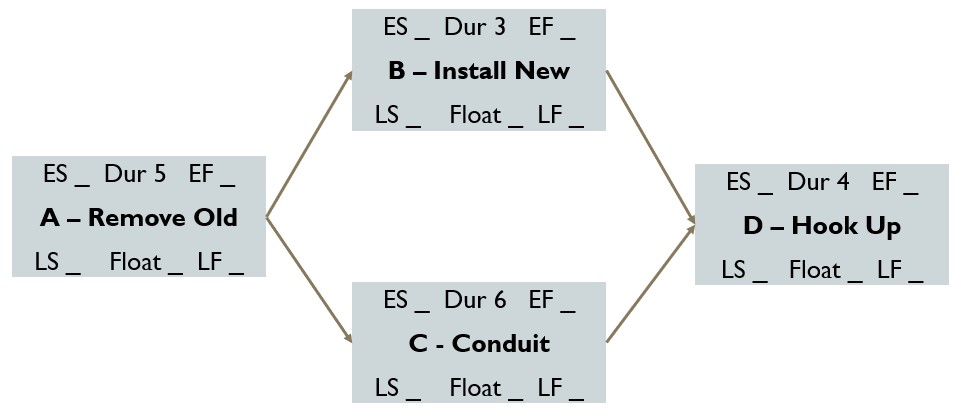
The essence of this exercise is to pinpoint tasks with minimal or zero float, marking them as components of the project’s critical path. This path represents the sequence of tasks that are paramount to the timely completion of the project. Any delays along this path invariably result in project setbacks, highlighting the significance of precise and vigilant project scheduling.
Implementing CPM in Construction Projects
The Critical Path Method is implemented through a structured approach, involving:
- Task Identification: Listing all necessary tasks for project completion.
- Dependency Mapping: Defining the relationships between tasks to understand sequencing needs.
- Duration Assignment: Estimating the time required to complete each task.
- Network Diagram Construction: Organizing tasks in a visual representation that illustrates their dependencies.
- Critical Path Analysis: Conducting forward and backward pass calculations to reveal the project’s critical path, guiding focus areas for strict schedule adherence.
Summary
Mastering construction scheduling involves grasping the basics of scheduling, developing a thorough Work Breakdown Structure, and applying the Critical Path Method. These methodologies not only facilitate resource optimization but also ensure project milestones are met efficiently. Through the structured decomposition of project tasks and critical path analysis, project managers can navigate the complexities of construction projects, leading to successful project execution.
Test your knowledge!
What does the Critical Path Method (CPM) determine in construction project management?
Activity 3.4: Scheduling Scenarios
Objective
To apply learned scheduling techniques to practical scenarios, developing essential skills in creating Work Breakdown Structures (WBS), network diagrams, and identifying the critical path in project scheduling.
Instructions
Choose 1 scenario and complete the following tasks:
- Develop a Work Breakdown Structure (WBS): Identify and break down the deliverables into smaller, manageable tasks. Ensure clarity and measurability for each work package.
- Create Network Diagrams: Draft a visual representation that shows the sequence of tasks and their dependencies. Utilize online tools or software to illustrate the network diagram effectively.
- Calculate and Identify the Critical Path: Using your network diagram, determine the sequence of tasks that represents the project’s longest stretch of dependent activities. Highlight the critical path and note any tasks with zero float.
- Submission: Compile your WBS, network diagrams, and critical path analysis for each scenario. Submit these documents along with a brief explanation of your process and findings.
Scenario 1: Urban Community Center Renovation
Objective: Plan the renovation of an urban community center, including updates to the main hall, construction of two additional classrooms, and the installation of a new HVAC system.
Deliverables:
- Renovation of the main hall.
- Construction of two new classrooms.
- Installation of a new HVAC system.
Constraints:
- The project must be completed within 6 months.
- Work on the new classrooms can only begin after the main hall renovation is completed.
- HVAC installation can proceed concurrently with the classroom construction but requires the main hall’s ceiling work to be completed first.
Scenario 2: New Suburban Park Development
Objective: Develop a new park in a suburban area, including landscaping, playground construction, and the installation of public restrooms and lighting.
Deliverables:
- Landscaping the entire park area.
- Constructing a children’s playground.
- Installing public restrooms and lighting throughout the park.
Constraints:
- The project must be finished before the start of the local school summer break (5 months).
- Playground construction can only start after half of the landscaping is completed.
- Restroom and lighting installation can begin once the playground’s foundation is laid.
Scenario 3: Downtown High-Rise Construction
Objective: Construct a new high-rise building downtown, encompassing site preparation, foundation laying, structural framing, and the installation of electrical and plumbing systems.
Deliverables:
- Site preparation for construction.
- Laying the foundation.
- Structural framing of the building.
- Installation of electrical and plumbing systems.
Constraints:
- The construction must adhere to a strict 12-month timeline.
- Foundation laying cannot commence until site preparation is fully completed.
- Structural framing depends on the completion of the foundation.
- Electrical and plumbing installations require the structural frame to be at least 50% completed.
Engaging with Industry Experts 3.1
As we deepen our understanding of the construction industry, it’s invaluable to gather insights from various sources, especially those who are actively shaping the field today. Engaging with industry professionals provides a unique opportunity to gain first-hand knowledge and perspectives.
Instructions
As part of this module, we’ll be incorporating insights from a panel of notable industry professionals as they dive into the practical considerations they consider best practices and how accountability should be effectively managed. Panelists include Cheryl Cairns, Partner, Trowers & Hamlins LLP (moderator and panelist ), Akash Paunikar MRICS, Contracts Manager, Ras Al Khaimah Economic Zone (RAKEZ), Dafydd Wyn Owen, Partner, HKA.
Reflection
Once you’ve watched the video, take a moment to reflect on the new information and perspectives shared. To guide your reflection, consider the following questions:
- Learning Takeaways: What is one new piece of information you learned from the panelists’ insights? How does it add to your understanding of the construction industry?
- Connection to Class Topics: Did the videos help clarify any of the topics we’re covering in class? Describe any connections or insights you’ve made.
- Curiosity and Questions: Were there any questions you wished to ask the panel while watching the videos? If so, were these questions addressed in the content?
- Looking Forward: Based on what you’ve learned, what is one question you would like to explore further?
Evaluation Criteria
Your responses will be evaluated based on the completeness of your answers and the depth of your reflections. Aim to provide thoughtful and detailed responses, with each answer comprising at least one well-developed paragraph. Your complete reflection should not exceed two pages.
This exercise is not only about what you’ve learned from the videos but also about how you integrate this new knowledge with our classroom discussions and your curiosity about the construction industry.
Module 3 Recap
In this module, we dove deep into the strategic and essential process of Project Planning & Scheduling, laying the groundwork for successful project execution in construction project management. Let’s recap the key concepts and reflect on the invaluable tools and methodologies that are shaping our approach to managing complex construction projects.
What We Learned
Understanding Project Planning and Scheduling:
- The planning phase is pivotal, serving as the project’s roadmap, where we outline all technical requirements, establish a detailed scope, and break down the work into manageable parts using a Work Breakdown Structure (WBS).
- Scheduling involves solving the critical path, which optimizes the timeline and resources, ensuring project milestones are met efficiently.
Attributes of Effective Planning:
- Effective project planning involves meticulous detail orientation to foresee potential pitfalls and incorporate risk assessments, communications, and quality plans into the project framework.
- The outcome is a robust plan that includes a defined scope of work, refined objectives, and a clear course of action.
The Role of Building Drawings in Planning:
- Building drawings play a crucial role by providing visual representations that guide the construction process and aid in cost estimation.
- Different types of drawings, including architectural, structural, and mechanical, provide specific insights essential for various aspects of project planning.
Project Scheduling Dynamics:
- We applied basic scheduling techniques to manage project timelines effectively, understanding the critical path method to optimize project duration.
- The critical path not only helps in identifying the longest stretch of dependent activities but also focuses on ensuring project efficiency.
Risk Management in Planning:
- Recognizing potential risks and devising strategies to manage them is integral to the planning stage.
- We explored methods to mitigate, transfer, or accept risks, ensuring that we prepare for uncertainties effectively.
Applying the Knowledge
Through this modules lessons, learning activities, and reflections, you have been equipped to:
- Develop detailed project plans and schedules that consider all facets of a construction project.
- Use building drawings to extract critical information for project execution.
- Apply risk management strategies effectively to safeguard project timelines and budgets.
- Understand and implement the critical path method to ensure project tasks are completed in an optimal sequence.
Looking Forward
Reflection and Engagement
- Reflect on how your understanding of project planning and scheduling has evolved. How do you view its impact on the overall success of construction projects?
- What aspects of project scheduling and the use of building drawings do you find most compelling, and how will these influence your approach to future projects?
Module Three Quiz
Wor
1. These types of drawings reflect the site plan, grading, and where the building is on the property.
a. Civil drawings
b. Architectural drawings
c. Structural drawings
d. Mechanical drawings
2. These building drawings reflect heating, ventilation, and air conditioning in the building:
a. Electrical
b. Mechanical
c. Plumbing
d. Fire protection
3. If you want to know what Architect contributed to the drawings, you should look at the:
a. Cover sheet
b. Title block
c. Notes section
d. Legend
4. CPM stands for:
a. Critical Path Method
b. Construction Planning Model
c. Complete Project Management
d. Cost Performance Measure
5. Critical Path Method is a 3-Phase procedure consisting of:
a. Planning, Execution, Monitoring
b. Identification, Analysis, Response
c. Sequence Activities, Network Diagrams, Schedule Estimation
d. Design, Develop, Deliver
6. True or False: Creating a network diagram is usually a static and one-time process for construction.
a. True
b. False
7. True or False: A work breakdown structure includes construction, procurement, and management activities.
a. True
b. False
8. True or False: Work breakdown only focuses on the activities in drawings.
a. True
b. False
9. True or False: A work package is a single, measurable piece of work that will be performed by one entity in a single time period.
a. True
b. False
10. When estimating activity durations, it is important to:
a. Consider only the optimistic time estimates
b. Consult the project team and use historical data
c. Use a standardized duration for all activities
d. Ignore any potential risks or delays
Works Cited
- Hendrickson, C., Hendrickson, C. T., & Au, T. (2008). Project Management for Construction: Fundamental Concepts for Owners, Engineers, Architects, and Builders. Chris Hendrickson. The license allows reproduction for educational purposes with citation.
- RICS. (2021, March 3). Risk management and accountability in complex construction projects [Video]. YouTube. https://www.youtube.com/watch?v=2ToLOCIiBd0
- McLachlan, David. (2022, March 11). How to Make a Risk Assessment Matrix in Excel [Video]. YouTube. https://youtu.be/KIS4L4kn0RM?feature=shared
